
Using Word styles
You probably don’t think much about formatting while you’re writing your manuscript, but I recommend you set up a few specific styles at the start of a writing project. This will help later during the editing process as well as for formatting into your book. Using Word Styles is one of the fastest ways to set up this basic formatting for your manuscript.
You should set up styles for chapter headings, regular paragraphs, and the first paragraph of a chapter/scene. (These are all styles I set up during my editing process if an author has not done so already.)
The best part about styles is that if you decide to make a change—for example, if you want your chapter titles to be in bold but they weren’t already—you don’t need to go through every instance individually and bold each one. You can just modify the style and boom—all your chapter titles are now bold.
Chapter headings
To set up a style, look at the Styles ribbon at the top of your Word document. You can either create a new style or modify an existing one. I prefer to name styles so they correspond directly to what they are used for, so instead of the Heading 1 label Word uses, I usually use Chapter as the label. But I use the Heading 1 style as a base and modify it.
Right click on the Heading 1 style and select Modify.

This will open the Modify Style box. Change the name of the style to Chapter. You can also modify the formatting, which includes the font, font size, bold/italics/underlining, and font color.

Then click the Format button at the bottom left. Make sure the Outline level is set to Level 1. You can change the alignment (for example, if you want the chapter title centered), but I’d recommend leaving the indentation and spacing as shown in the photo.

Next, click the tab for Line and Page Breaks. If you’d like to make sure each chapter starts on a new page, click the check box next to Page break before. (No more hitting Enter a dozen times to move down to the next page!) Click OK twice and the formatting for this style is done.

Regular paragraphs
You can either use the Normal style for this, change its name to Regular Paragraph (I actually use RegularPara), or create a new style. We’re going to modify the Normal style for this example. Right click on the Normal style in the Styles ribbon and select Modify.
You can change the font and size if you would like, but the important part for this style is in the Format box (click format and then select Paragraph). Double check that the Outline level is set to Body Text. Then take a look at Indentation. Each paragraph should start with an indent, and this is how you set that up. (No more using Tab!) Under Special, select First line. The default setting under By: should be 0.5" but I find that to be too large of an indent, so I usually change it to 0.3".
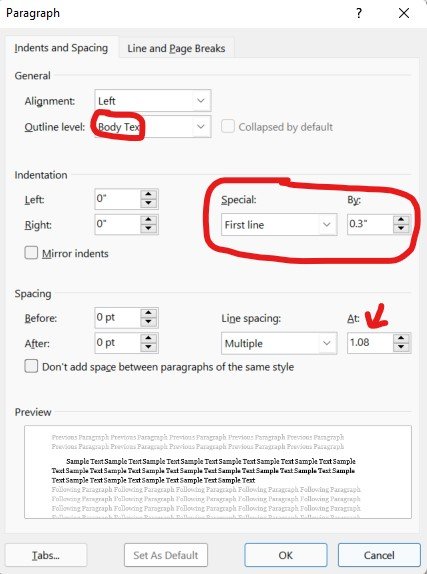
For spacing, you do not want to add additional space between paragraphs, so leave Before and After set to 0 pt. For Line spacing, you can make changes, but while I’m editing, I prefer to have only a little space between lines, so the default of Multiple at 1.08 works for me. You might prefer to have more space between lines, so you can make adjustments, but I wouldn’t go for full on double spacing as that creates a lot of extra spacing. At most, I’d recommend 1.5 spacing.
Click OK twice and you’ve got your regular paragraph style all set up. Now you can just hit Enter at the end of a paragraph and not have to worry about hitting it again to add an extra space or hitting Tab to indent a paragraph.
First paragraph of each chapter/scene
Go take a book off your shelf and open it up to the start of a chapter. Do you notice that the first paragraph of a chapter typically is not indented? (Sometimes print books use a drop cap here.) I highly recommend that you follow this publishing practice and also lose the indent on the first paragraph of a chapter and also of each scene.
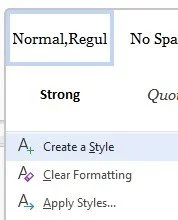
To set that up, we’re going to create a new style. Click on the dropdown arrow on the right of the Styles ribbon and select Create a style.
Give the style a name (I usually use FirstPara) and then click the Modify button.

In the Styles box, make sure the Style based on is set to Normal if you modified Normal for your regular paragraphs; if you set a new style for regular paragraphs called RegularPara (or whatever you named it), choose that as the Style based on. You’ll also want to choose Normal (or RegularPara) for the Style for following paragraph.

Click the Format button and select Paragraph. The only difference between this paragraph style and the regular paragraph style is that this one doesn’t indent the paragraph. So make sure that Indentation is set to None.

Other style options
You could go crazy with styles and set up a style for everything, but I recommend that you stick to just these three styles to start with. Go ahead and use the Italics button to set off words in italics rather than creating a specific style for text in italics.
There are a couple of other styles you might try, however. If you have scene breaks in your text and use *** centered on the page, you can set up a new style for SceneBreak and under Alignment, choose centered. If your story uses text messages and those are formatted differently (perhaps using a different font), you can set up a style specifically for text messages.
Using styles
As you write, select the style you need when you are about to type text in a different style. (This would be for chapter titles and first paragraphs, for example.) Click on the style you want to use in the Styles ribbon and type your text. If you have already typed your text, select that text and then click the style on the Style ribbon. And like magic, Word will set that text in the style you’ve chosen.